
Gear & Glossary
Welcome to the gear page! As part of each edition of our email newsletter, we’re diving into detail on a special piece of equipment or training we will acquire for our crossing. These gear features are stored here, along with a short glossary of common terms. Be sure to check back as the feature list grows, or subscribe to our newsletter at the bottom of the page to get the latest updates delivered right to you.
Find a specific feature here by category or scroll to browse alphabetically. You can also skip to the glossary at the bottom of the page.
Emma
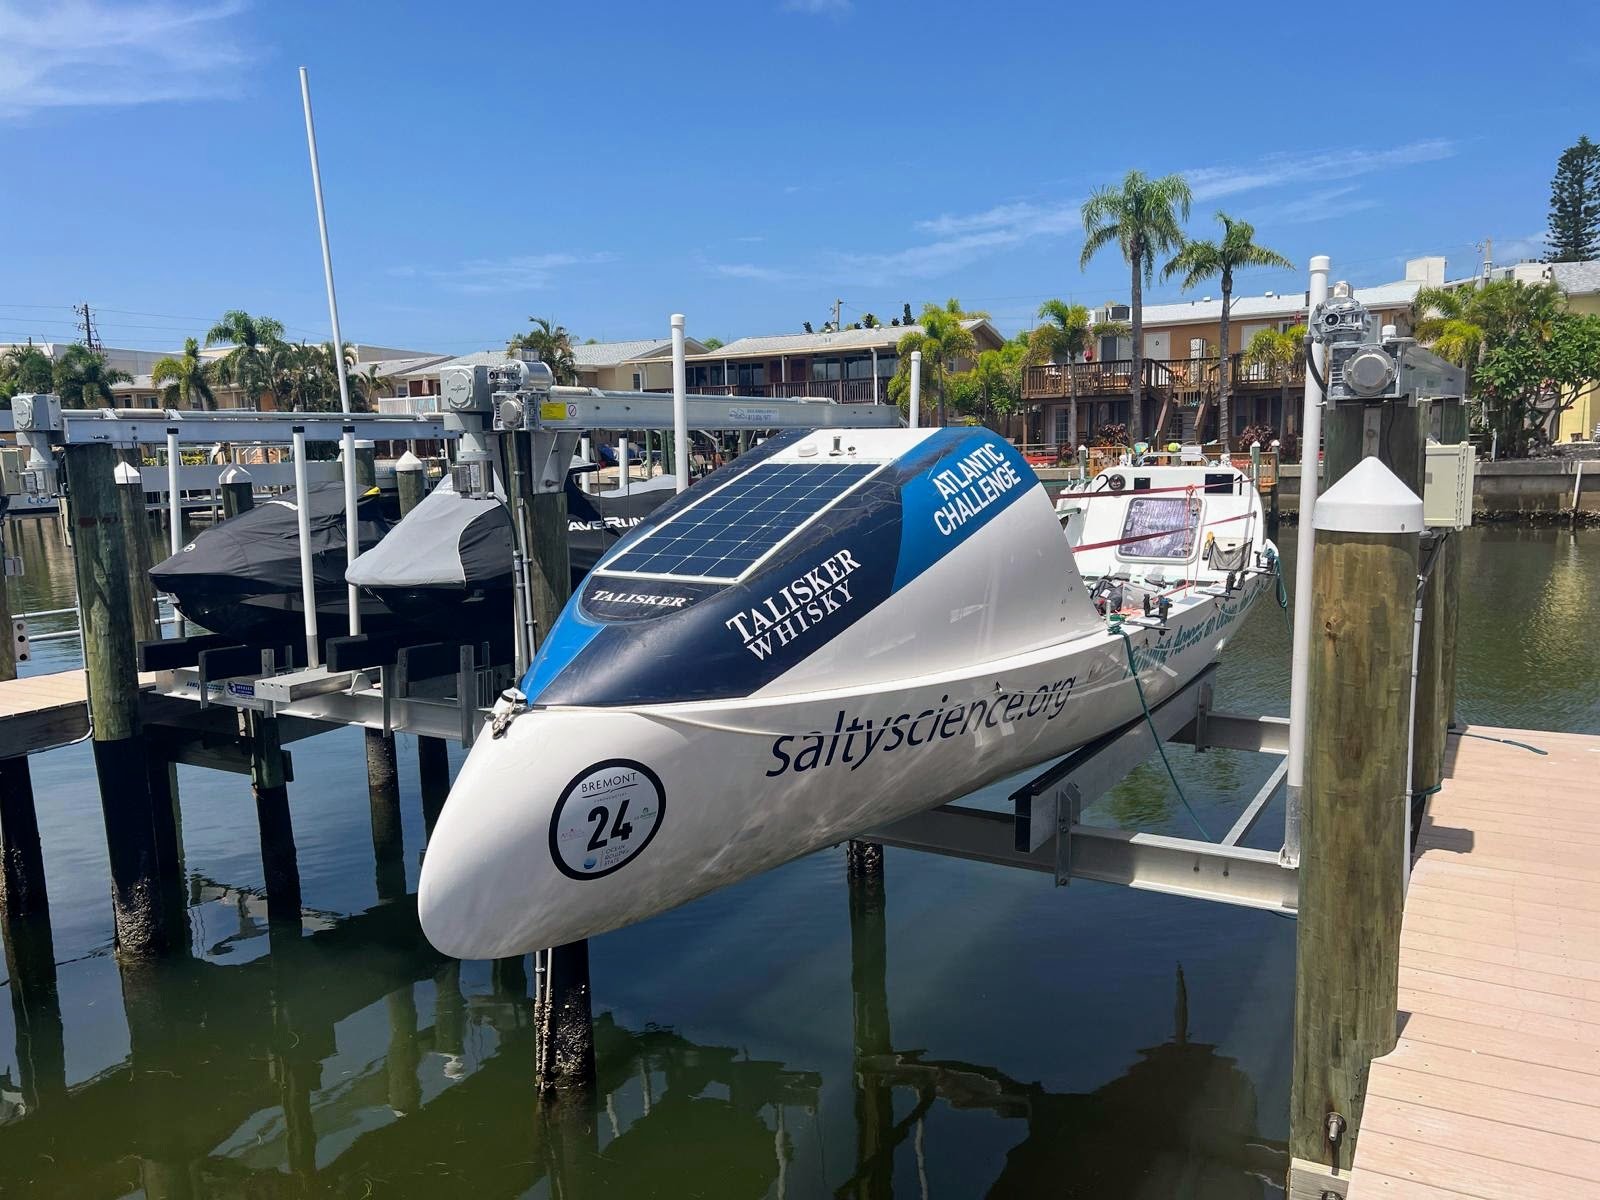
Our boat Emma is a 2018 Rannoch 45, built primarily of carbon. At 28 feet long Emma has three rowing positions and is designed for teams of four or five people. At her widest, she is 5’ 9” across and she has a similar height from the keel to her highest point. With safety harnesses worn by each rower on deck attached to the boat in 2 places, and “lifelines” running from stern to bow, our crew of four will have to work together to minimize instability while moving around this little boat!
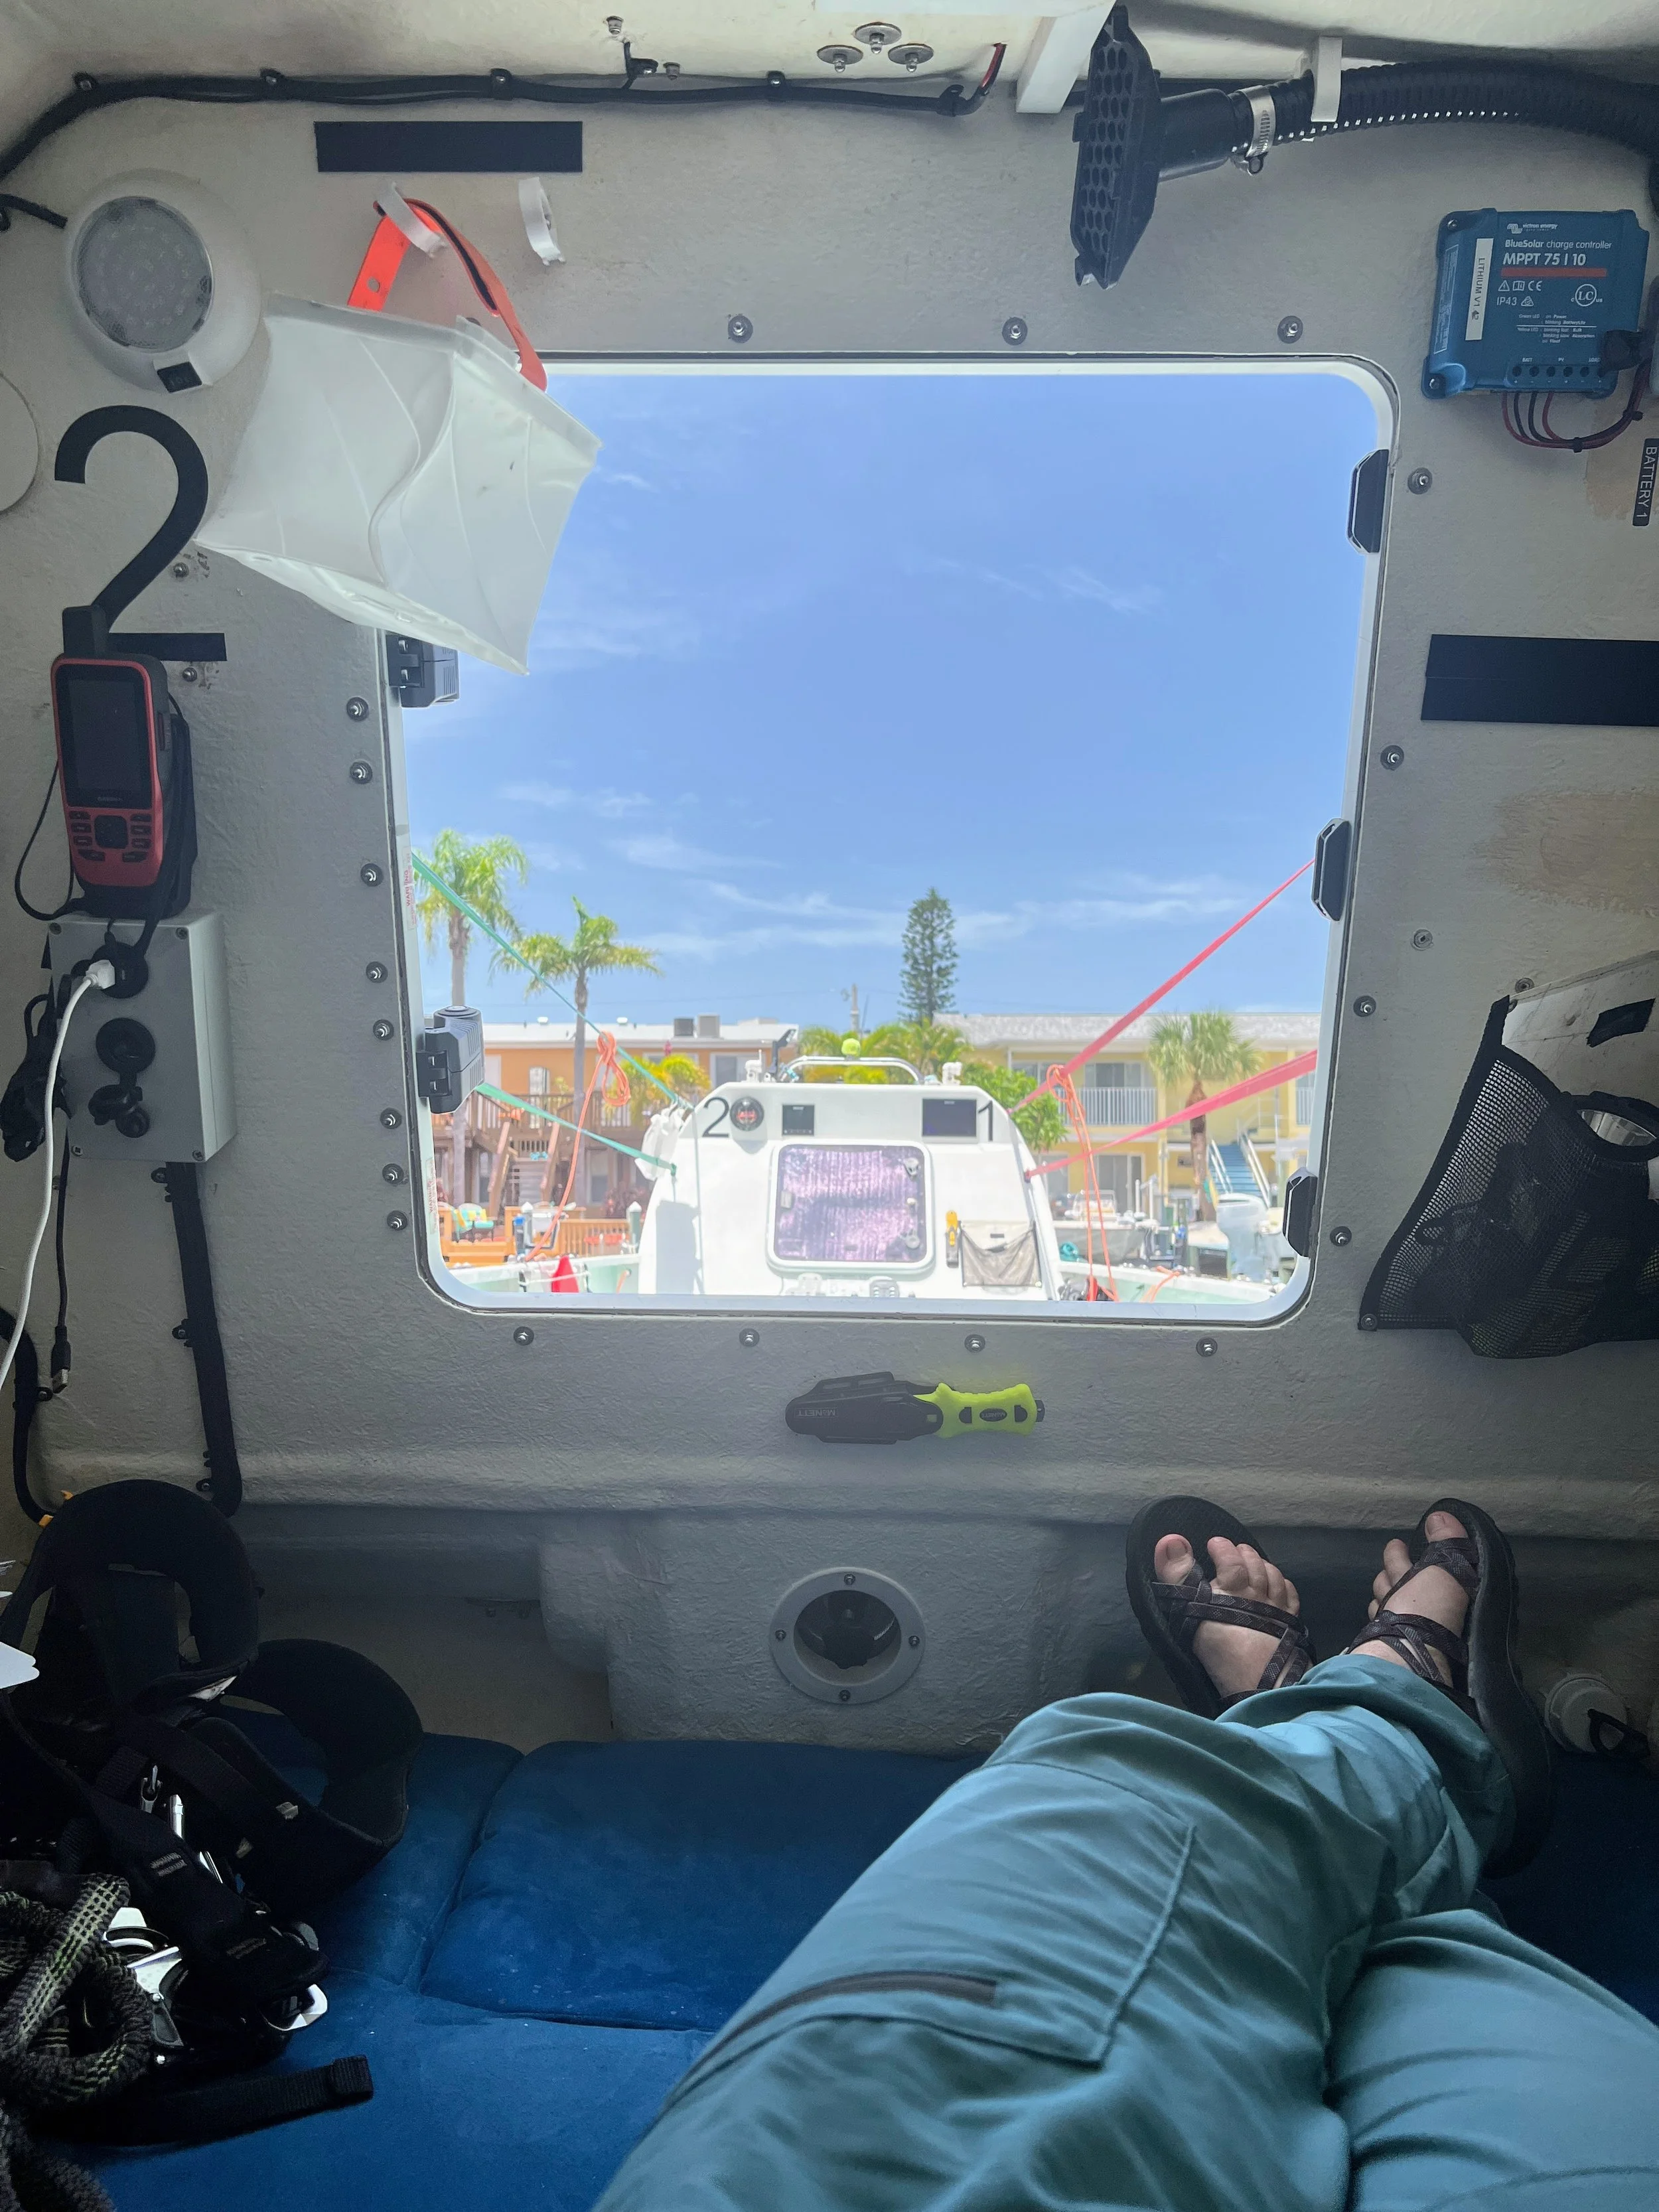
Emma has two berths, or cabins, on board. The stern cabin will hold all of our navigation and communication equipment, along with the autotiller that will help us keep on track when we are not manually steering. The bow cabin will house the para anchor, medical supplies, and tools for repairing anything and everything on board. It is hard to imagine at the moment, but these small spaces will soon become our refuges - places where we can get out of the driving rain, the baking sun, and the ocean spray that many ocean rowers say hits you right before your shift is over, sending you into your cabin drenched.
Inside the cabin, there are netted pockets along the sides of the hull to hold personal and safety items such as flashlights, a compass and tools, and also journals, lip balm, and snacks. In such a tight space, organization and cleaning up after oneself are key. When the shift changes, one rower’s “bedroom” becomes another’s!
Out on deck and above the cabins, Emma has solar panels to charge our electronics, a flagpole to fly our nation’s flag, and speakers for music and audiobooks that, hopefully, will function all the way to Hawaii. Our life raft and emergency “go bag”, our water maker, and all of our food is stored in lockers along the deck. One thing you may have noticed that Emma does not have is a bathroom of any kind. We will have multiple buckets for waste and washing with foolproof ways to identify one from the other - even in the dark!
Emma will have made 4 ocean crossings when we take possession of her in the Spring of 2024. We can’t wait for her to arrive to start getting to know her!
Immersion Suits
Part Gumby suit and part Stay-Puft Marshmallow man, the immersion suit is a silly-looking but serious piece of gear for our journey. Made of thick bright orange or red neoprene, the suit is crafted to keep a person alive if they are plunged into cold ocean waters or are exposed to frigid temperatures for an extended time. The closed cell foam is composed of thousands of tiny air bubbles, making the suit buoyant enough to act as a personal flotation device. Properly donned, an immersion suit can allow a person to stay in frigid waters for 3-6 hours.
The suit is thick, heavy, and restrictive, so donning it can be a challenge— especially in tight quarters. The stiff zipper goes from the crotch to just under the nose, and a tight hood covers most of the head. An additional flap of neoprene covers most of the face, right up to the eyes! The suit has built-in booties, and velcro straps that go around the ankles and wrists. The hands have rubber gloves that can be covered by neoprene mittens attached on strings, allowing for dexterity when needed and insulation all other times.
Moving about in a suit on board is laborious and awkward— picture a kid bundled up to go play in the snow— and in the water, it’s not much different. The suit is shockingly buoyant, and your legs naturally float at the surface of the water. It is difficult to maneuver or swim normally (we only practice using the suit in the ocean while tethered to the boat), which can be alarming. Although the ocean squeezes the suit tight against the body and makes you feel like you’d be wet, the suit is watertight and keeps the wearer completely dry.


Life Vests
There are hundreds of styles of life vests on the market. While choosing the right type is important for any water activity, it is especially critical for an unsupported ocean crossing in a 28-foot-long boat. It's safe to say those bulky orange life vests from family camping trips of yore will not cut it for rowing at sea! (Well, they might cut something-- our armpits and sides from all that chafing!)
Since we don our life vests each time we step out of the cabins and keep them on for our entire rowing shift (12+ hours per day), our team needs low-profile life vests contoured to our bodies. The vests must adjust to accommodate the wide range of clothing we may wear during the crossing without restricting the range of motion needed for rowing. The life vest buoyancy, measured in Newtons(N), must also match our activities at sea. While recreational vests are rated ~50N and commercial sailors may use up to 275N, ours should be 150-170N. Other safety requirements include flashing lights that activate upon inflation, a whistle, reflective tape, a crotch strap to keep the vest in the correct position if in the water, and a hood to protect from sea spray and sunshine.
Finally, we must consider the different inflation methods available for life vests. Manual vests require the user to pull a tab to inflate the vest, which is not always possible in emergencies. Automatic vests have pellets or tabs that dissolve when wet, causing a reaction that releases gas to inflate the vest. This latter method is not a good fit for ocean rowers, as they are constantly getting soaked from waves and ocean spray! Hydrostatic life vests are the third inflation method and the best for our team. These vests will inflate after being submerged in about 4 inches of water and are also equipped with a manual pull tab for backup.
Life vests are one of the most important personal safety items we will take on the boat, and our team is seeking whole or partial donations specifically for their purchase. We expect each vest to cost approximately $375, and we look forward to embroidering our vest sponsors' names onto them, reminding us of the folks at home who contributed to keeping us safe at sea.

source: rannochadventure.com

source: rannochadventure.com
Navigation & Seamanship
“Why do you need to know how to navigate? Just head west!”
If only getting from Monterey, California to Kauai, Hawaii were that easy!
Although we will spend the vast majority of our crossing in open water, our team still needs to know how to create and follow passage and pilotage plans. Navigating into, out of, and around coastal areas can be a very dangerous part of boat handling on our rows, and even in open water, the wind and current don’t always agree with “just head west”!
To learn everything necessary for safe navigation, each member of our team is required to take the Royal Yacht Association (RYA) Essential Seamanship and Navigation course. Since we live in the US, we are able to take the course online at our own pace. All our course materials (charts, almanac, plotter, and divider) arrive in the mail. Here’s a little of what’s covered:

source: boatus.com
Buoyage: How to read buoys that mark safe passage in and out of a port (lateral buoys), obstacles (cardinal buoys), safe water marks, isolated danger marks, and special marks. We also need to know how to interpret light signals (flashing or green, and duration) and stripes or markings.
Safety: The importance of checking weather, confirming and sharing a passage plan and a pilotage plan, the boat, critical gear (life jackets, med kit, foul weather gear, sunscreen, VHF radio, fire blanket, etc), and food/fuel/water stores.
Anchoring: How to know where to anchor if you have to stop mid-way through a journey, and how the seafloor, wind, and tidal stream will affect the situation.
Tides: How to consult charts for tide (vertical movement of water) and tidal stream charts (horizontal movement of water), and how wind direction can affect your speed along a tidal stream.
Electronic Navigation: All trips are broken into smaller distances called waypoints– kind of like traveling from rest stop to rest stop on a long car ride. With all the satellites in Earth’s orbit, electronic navigation can tell us where we are, course over ground (the direction we’re heading), and distance to a waypoint. If electronics fail, we also need a backup means of knowing where we are and where we are going.
Right of way: If two boats are traveling on an intersecting path, who gets to go first? There are many rules for right of way in harbors, but since we have no loud horns and are such a small and unconventional craft, at sea we’ll just keep an eye out for other boats on the water and radar and use the VHF radio to alert them of our presence.
Weather: Understanding wind direction and strength, the Beaufort Scale (measures wind speed by observing sea conditions such as wave height and sea state), visibility, and how changes in the weather due later (12+ hours away), soon (6-12 hours away), and imminently (within 6 hours) will affect us.
Pilotage: There are many obstacles (stationary and moving!) when entering and exiting a harbor. A pilotage plan takes obstacles, tide, weather, and more into consideration to help us navigate safely in confined waters.
Passage Planning: How to make a comprehensive navigation plan for an entire voyage, taking into account weather, gear, waypoints, pilotage plans, navigation plans, and safety. When we are crossing the Pacific we will check (and re-check) these things every day.
Para Anchor
A para anchor, or sea anchor, is a vital piece of equipment to have during an ocean crossing. As our boat is very small (28’ long, 6’ at its widest) and the ocean is extraordinarily deep, we need an anchor that doesn’t have to reach the sea bed in order to hold our boat in place when the weather proves too difficult to row.
Unlike a traditional anchor that sits at the bottom of the water, a para anchor sits just under the surface. It is made of high-strength nylon fabric and, when deployed, spreads out and fills with water— similar to how a parachute fills with air (get it? para-chute anchor?). Always deployed from the bow, the para anchor will “anchor” our boat in the water, limiting motion and stabilizing position to the wind to keep the bow heading into oncoming waves. This reduces the likelihood of our boat rolling over (though it is self-righting anyway) and prevents us from losing precious miles to drift in the event we have to wait out a storm in our cabins.
Part of our preparation before the race will be to practice and become fluent with deploying and bringing in the para anchor. Before we are allowed to start the race, we will be required to demonstrate this skill to ensure proper technique is used.

source: anchoring.com

source: oceannavigator.com
Sea Survival Course
The World's Toughest Row is an organized international race, led by a team of dedicated and experienced ocean rowers. To be eligible to participate, teams must complete an extensive list of training requirements and coursework, including offshore sea survival training.
In the UK (where most ocean rowers are still based), race participants take their sea survival training course through the RYA (Royal Yachting Association)— the UK’s national governing body for sailing, yacht and motor cruising, sail racing, sportsboats, windsurfing, and personal watercraft. Rowers like us in the US are given the option to attend an RYA course in the UK or are allowed to find our own equivalent (approved) course that is confirmed to meet all the same training benchmarks. Where better for us to do that than at the US Naval Academy?!
In April of 2024, Taylan, Courtney, and Julie traveled to the US Naval Academy in Annapolis, MD to attend US Sailing’s International Offshore Safety at Sea course. The 18 hour course was divided into two days: approximately 9 hours of classroom-based lectures on Saturday, and 6.5 hours of discussions and hands-on practical work on Sunday. Sessions were led by a slew of highly qualified and experienced professionals from the Coast Guard, Naval Academy, US Sailing, and more. Topics each day included:
SATURDAY CLASSROOM LECTURES
– Giving assistance
– Crew overboard rescue
– US Coast Guard Communications & Search and Rescue (SAR)
– Damage prevention and control
– Weather forecasts and features
– Storm sails and heavy weather
– Emergency medical care
– Care and maintenance of safety equipment
– Crew overboard rescue demonstrations (led by naval academy students, including a USCG helicopter rescue demonstation)
SUNDAY HANDS-ON PRACTICE
– Damage control & maintenance
– Life vests and life rafts
– Communications
– Fires and flares


VHF Radio
The VHF (very high frequency) radio is a critical piece of equipment on our boat. It is able to tell us our exact location, contact ships within a certain range and, most importantly, contact emergency response systems should we find ourselves in distress.
When making a “call” on VHF there are several specific protocols to help ensure clear communication. For example, if we wanted to contact a massive cargo ship passing nearby to make sure they see our boat, we would tune our radio to Channel 16—an emergency channel that ships are required to monitor for vessels in distress. To get the ship’s attention and let them know we’d like to talk, we might say something like, “Massive cargo ship, massive cargo ship, massive cargo ship, this is ocean rowing boat Emma, rowing boat Emma, rowing boat Emma. Over.”
After we make initial contact with said massive cargo ship, we would ask to take our conversation to a a different VHF channel not designated for emergencies, reestablish contact on the new channel, and finally get to tell them we just wanted to make sure they see us!
In an emergency situation, we can also utilize the VHF to make a mayday (emergency) or pan-pan (urgent situation that isn’t yet an emergency) call and request assistance from nearby ships and Search and Rescue. A red button on the handheld VHF can be activated to automatically send our location metadata to the nearest authorities, and a specific script like the one shown here guides the mayday broadcast..
Our VHF can also display information about our current course and speed, receive emergency weather notifications, be used to signal a crew member overboard, and can even be used as a compass!

Inside Emma’s stern cabin where there is a regular VHf as well as a handheld model.

Our own mayday procedure is modeled after this safety card. It is printed and laminated for hanging inside the cabin.
Watermakers / Desalinators
Our Schenker Smart 30 watermaker is one of the most important pieces of equipment on our boat. Tasked with desalinating the approximately 18 liters of water we require each day, our Smart 30 will provide us with the freshwater we need to hydrate ourselves, rehydrate our dehydrated meals, and periodically wash the saltwater, sweat, and grime from our bodies. While we will have a backup manual watermaker, the Katadyn Survivor 35, we hope the electric Smart 30 will do us proud during the crossing!
The Smart 30 uses 110W and is powered by Emma’s two lithium-ion batteries, which are charged by solar panels on top of the bow and stern cabins. Running the water maker will be a top priority on our chore list each day, so we will usually make our water around mid-day when the solar panels are working their best. Given how critical it is to have fresh water, our watermaker is considered a “Tier 2” energy need— second only to running our navigation and emergency contact equipment. If it’s a cloudy day, other power needs in tiers 3 and 4 must wait until after our water is made.
Although the Smart 30 typically makes 30 liters of water an hour, we expect that for most of the journey through the colder, denser Pacific waters, it will take an hour to make just our required 18 liters. As we approach HI and the water warms, we should be able to make our water faster.
All teams in the World’s Toughest Row are required to carry specific spare parts for their watermakers and should now how to troubleshoot each part of the system. The Smart 30 Watermaker can be broken down into 3 sections:
1. The pump: These components pick up seawater from a pump built into the bottom of a deck compartment on our boat. The water is pushed through a pre-filter to eliminate large particles and sent to the Watermaker Group.
2. The watermaker: A series of components use high pressure to force seawater through a second membrane to filter out the salt. The water is then divided into 2 flows: one that is now desalinated and becomes our freshwater, and another of high-concentration saltwater waste that drains out the side of the boat.
Working together, the pump and watermaker components elicit a reassuring, intermittent low “clunk” sound to let you know how they are doing, just by listening.
3. Accessories: These components facilitate the care and self-cleaning of the watermaker, such as a valve that allows the cartridge to be changed without depressurizing the system.

source: schenkerwatermakers.com
Smart 30 Typical Installation Scheme

source: schenkerwatermakers.com

source: katadyngroup.com
Ocean Rowing Glossary
Autopilot: an electronic system used in navigation where the rudder is automatically adjusted by the tiller according to the desired bearing to waypoint determined by the chart plotter. This system will make “steering” and staying on course easier for us since we won’t have to manually move the rudder with hand or foot steering to stay on course.
Ballast: Heavy material placed along the bottom of the boat to improve the boat’s stability. We will have jugs of water as ballast.
Bow: The front of the boat, which is behind rowers while rowing.
Bowline knot: An important knot for us to know, the bowline makes a fixed loop at the end of a rope.
Chart plotter: an electronic monitor used for marine navigation that shows the location of the vessel and can be programmed with waypoints to a particular destination. We use the chart plotter to engage and disengage the autopilot.
Deck Repeater: an electronic display that shows four pieces of crucial information: the desired direction, in degrees, to the waypoint; the actual course over ground the vessel is traveling (which should be as close to the bearing as possible); the speed of the vessel; and the number of miles to the waypoint.
Drogue: Attached to the stern by a long line, the drogue slows the boat down in a storm and, importantly, helps keep the boat facing into the waves. Boats that are turned parallel to the waves are more likely to roll over.
EPIRB: Emergency Position Indicating Radio Beacon. If engaged it will alert the worldwide SAR (Search and Rescue system) to send help to our exact location as quickly as possible.
Hull: The main body of the boat (sides, deck, and bottom).
Keel: Running along the bottom of the boat and sticking into the water, the keel helps stabilize the boat and prevents it from being blown sideways.
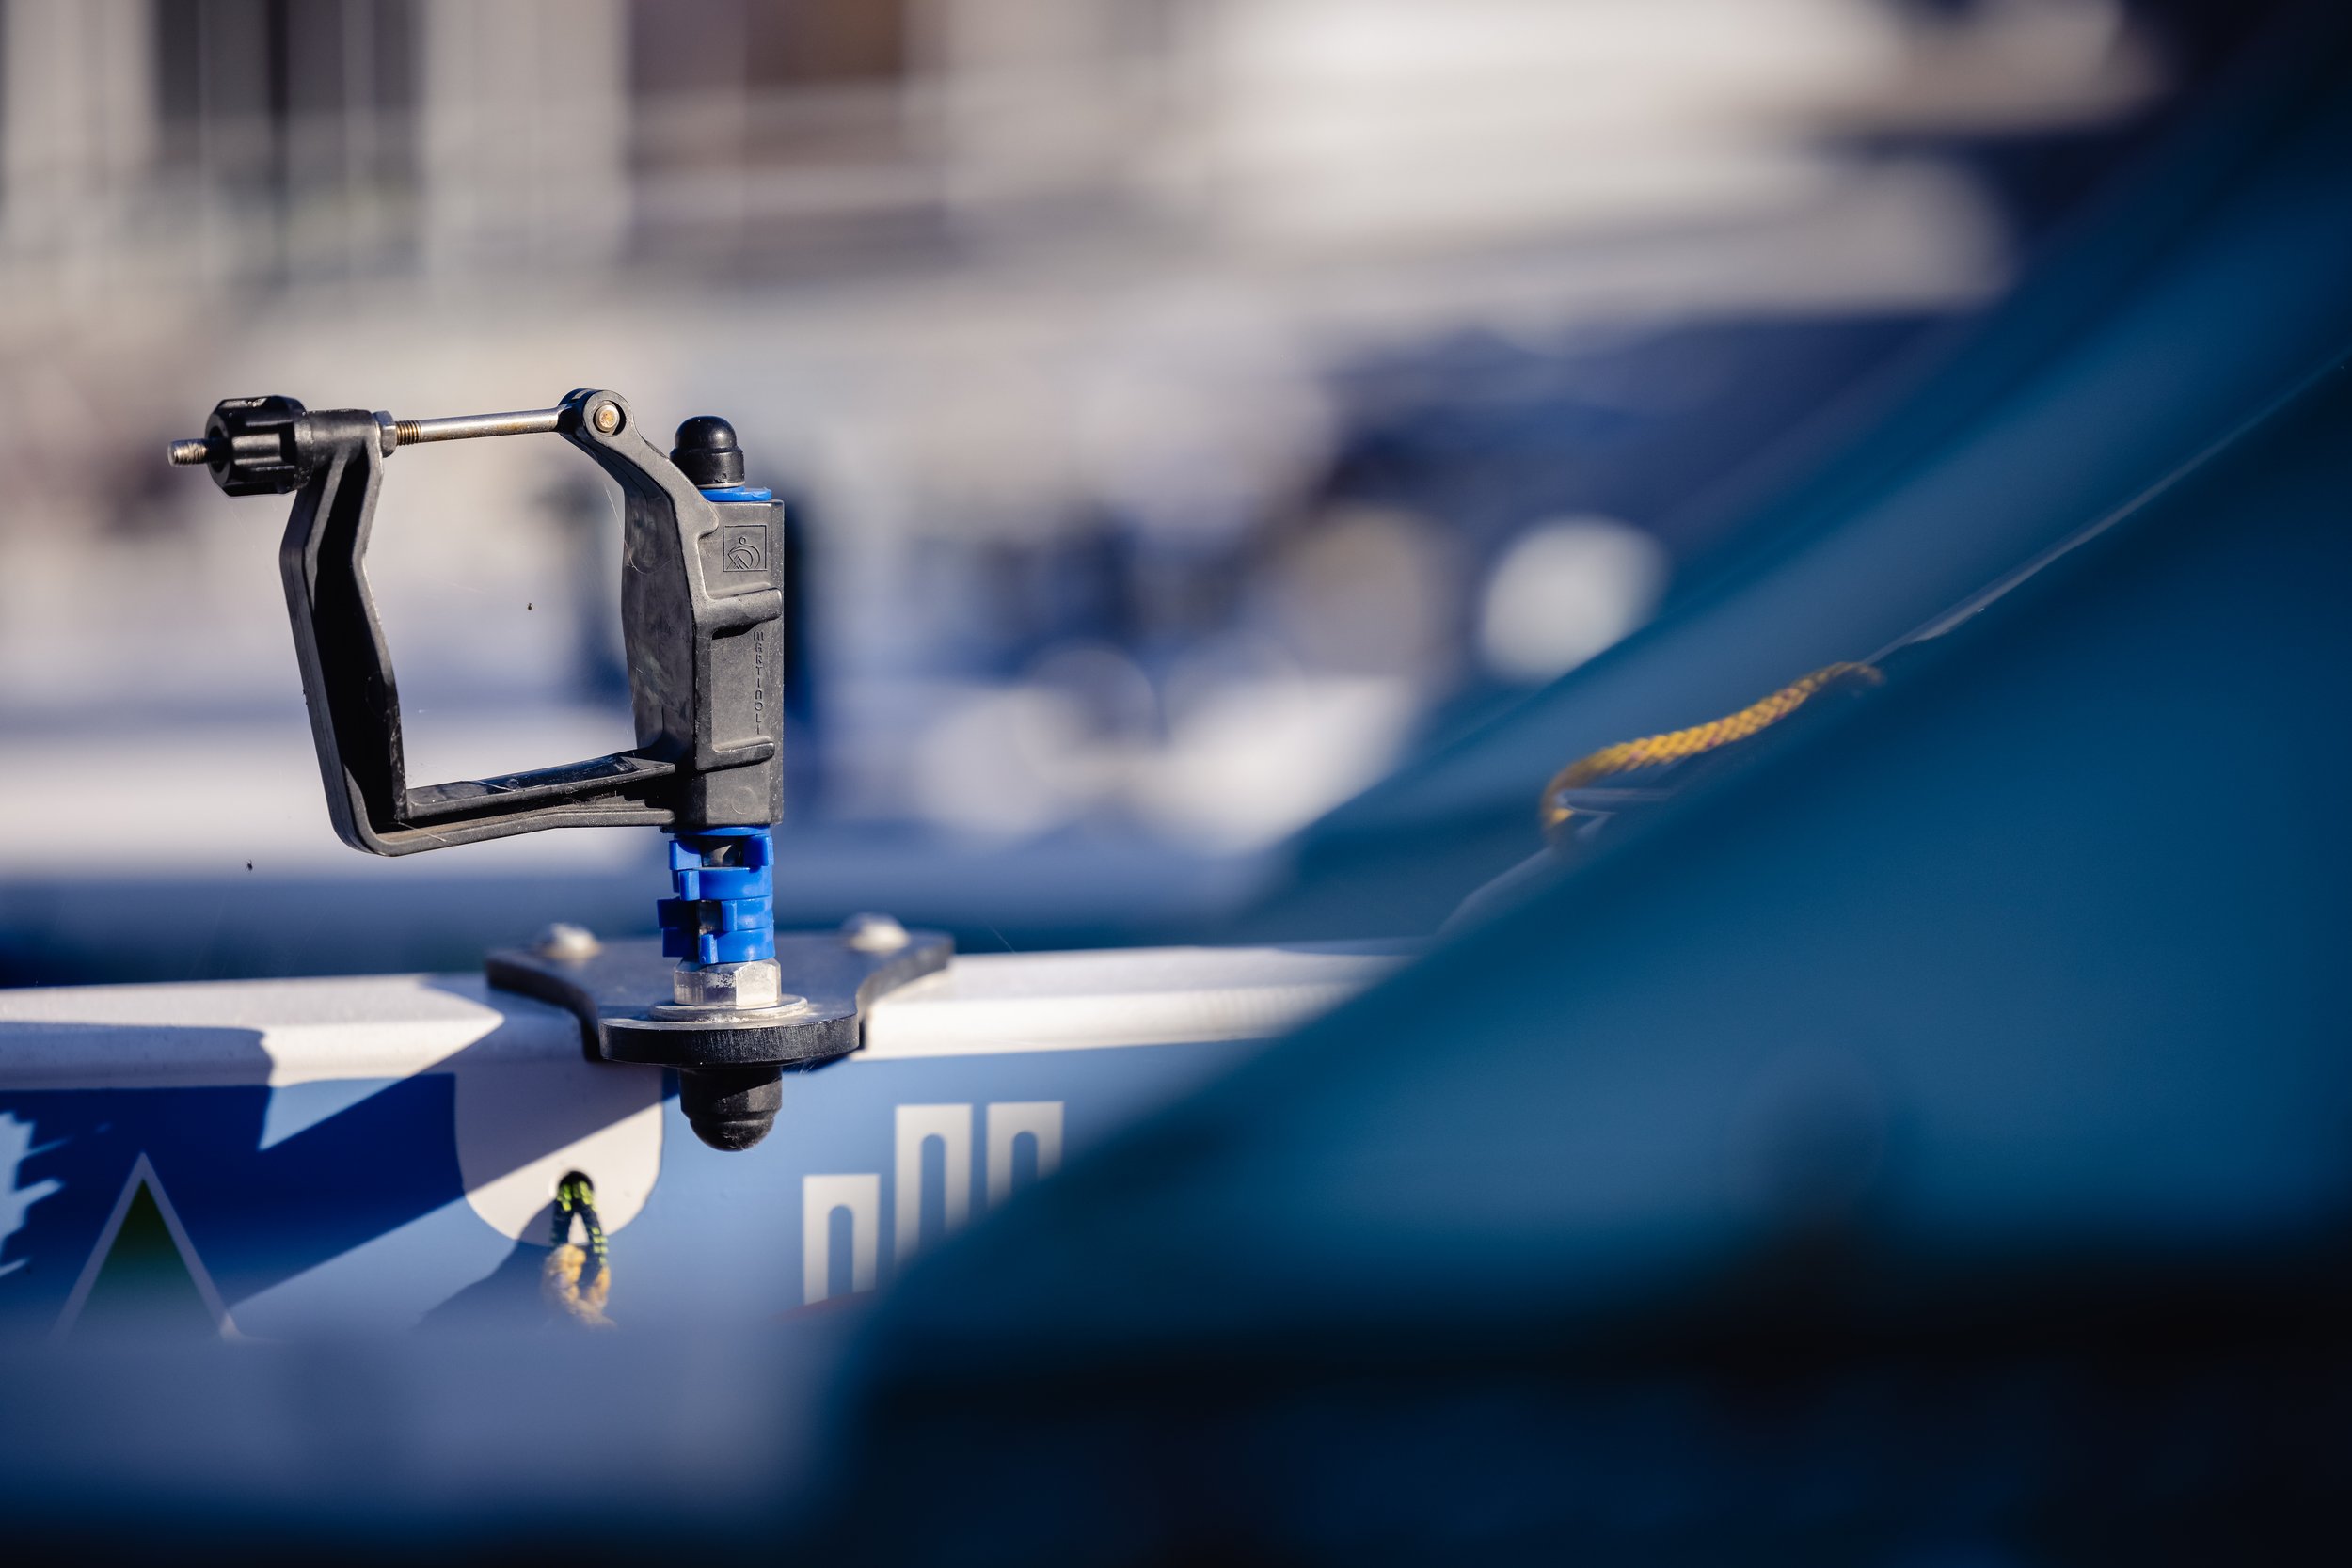
Oar lock: A U-shaped brace attached to a boat that cradles the oars and acts as a fulcrum. In tandem with the button on the oar, the oarlock prevents the oars from slipping overboard. (see banner image on this page)
Port: The left side of the boat when looking at the bow. For a rower, port is to the right since we sit facing the stern.
PLB: Personal Locator Beacon. A small, waterproof device that each rower wears attached to their harness. The device can be activated in the event a rower falls overboard to transmit their location to Search and Rescue.
Rudder: A piece of material shaped like a blade that is attached to the bottom of a boat near the stern. When controlled by the helm, the rudder turns the boat in the direction the helm is turned.
Starboard: The right side of the boat when facing the bow, and a rower’s left side.
Stern: The back of the boat, and the direction rowers face.
VHF Radio: Our Very High Frequency Marine Radio will allow for instant communication between our boat, other boats, and the United States Coast Guard (USCG).
Waypoint: an ending point (or one of many points) on a leg of a journey. Our trip of 2800 miles will be broken up into many waypoints.